This document explains how to install and activate the VIS.X® SDK in your React Native app for Android and iOS, using the VIS.X® React Native module.
Each React Native Module version is tied to a specific VIS.X SDK version, please refrain from changing SDK versions manually.
The VIS.X® React Native module is a wrapper, that will consume the native SDK for VIS.X® and offer an easy, standardized interface in React Native, allowing you to integrate the SDK with simple steps, rather than building a whole bridge on your own.
Please also ensure to check out our Getting Started guide first, to familiarize yourself with the features and formats and start the integration process after.
After the installation is done, you may continue with Banner and/or Interstitial integration to display ads and complete the integration process.
- Steps for adding the React Native module to your project
- Initializing the VIS.X® SDK in Android Studio
- Initializing the VIS.X® SDK in XCode
- Initializing the SDK in React Native
- Understanding Remote Configuration
Steps for adding the React Native module to your project
First, the VIS.X® React Native Module to your apps dependency; the module is available through the public npm repository.
{
"dependencies": {
    "@yoc/react-native-visx-module": "^1.1.0"
  }
}
Now install and update your app’s packages.
$ npm install
Initializing the VIS.X® SDK in Android Studio
The VIS.X® SDK for Android will be automatically added to the build.gradle of your app. So to activate it, simply clean your Android build.
$ ./gradlew clean
After you have rebuilt the project, you should see the module in Android Studio.
If not done already, extend the AndroidManifest.xml by declaring usage of Google Play Services. They are needed to access the Google Advertising ID (GAID, sometimes AAID), if possible.
<meta-data
    android:name="com.google.android.gms.ads.AD_MANAGER_APP"
    android:value="true" />
Initializing the VIS.X® SDK in XCode
The VIS.X® SDK for iOS is shipped as an XCFramework and must be dragged manually to your XCode Project aside from the React Native Module.
First, start with the init of the Visx React Native Module and update your pods.
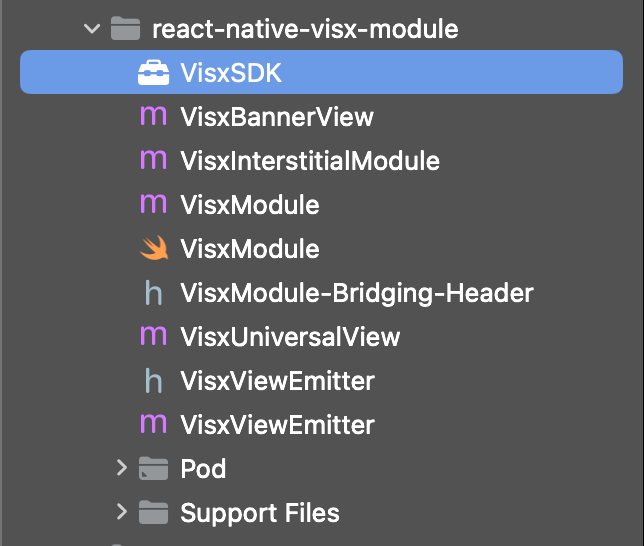
After opening your .xcworkspace file in Xcode and ensure, that you can find react-native-visx-module within the “Development Pods” folder. If you would build the App now, it will fail, as the VisxSDK needs to be added manually.
To do this, download the latest XCFramework from our public git repository. The last version tested is 4.1.6.
After you downloaded the framework drag it into the folder of react-native-visx-module and add the module as a target for VisxSDK.
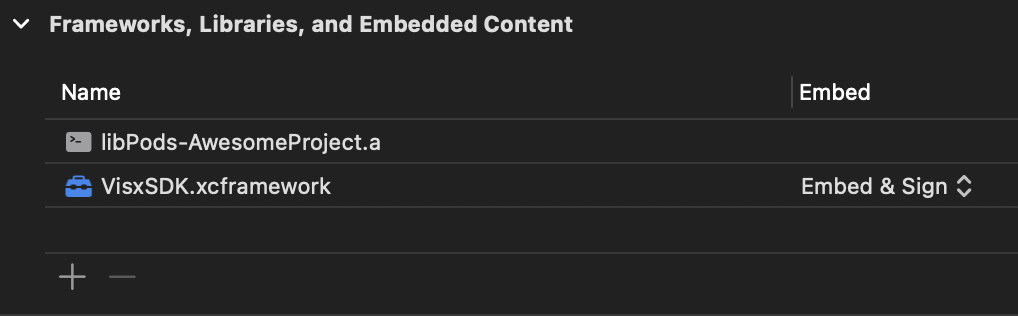
As a last step, go to the apps target and add VisxSDK.xcframework to the list of Frameworks, Libraries and Embedded Content as “Embedded & Signed”.
You should now be able to build the app again.
Initializing the SDK in React Native
While not mandatory, it’s highly recommended to initialize the VisxSDK before performing any ad call, as this allows VIS.X® to load additional configuration from the backend before an ad call is made.
The required configuration id will be provided during the technical onboarding of our service teams.
import { initVisxSDK } from '@yoc/react-native-visx-module';
//..
export default function HomeScreen({ navigation }) {
  initVisxSDK("yourConfigurationId");
  //...
}
Understanding Remote Configuration
Remote Configuration was introduced by YOC to provide publishers with additional convenience in setting up, commissioning and maintaining the SDK in the published app without requiring another release for every change.
The YOC Service Team can also use Remote Configuration to create and provide additional diagnostic data to publishers when needed, as well as temporarily or permanently disable features for specific user groups.
The processing of personal data is in all cases carried out under the European General Data Protection Regulation and exclusively based on the user’s explicit consent via the TCF 2.0 framework.